Thursday, July 31, 2014

Fishtail Friendship Bracelet Tutorial

Welcome back! In this tutorial you're going to learn how to make the easiest, most awesome friendship bracelet. I'm in love with this bracelet because it's super easy and so pretty. Who wants to be stressing while they're crafting? Not this lady!

Materials:
  • Embroidery floss in 4 colors
  • Scissors
  • Scotch Tape
  • Something sturdy to tape your bracelet to
Step 1:
Measure your floss. I wrapped it around my wrist twice and added an extra 2" then doubled that. Cut 3 strands of each color this length. Keep in mind that you want to have them as close to the same length as possible to avoid running out of floss.

Step 2:
Fold your thread in half and tie a knot at the end with the fold so you've got a loop.


Step 3:
Tape the loop down to your sturdy surface very well. You will be pulling and tugging on this so make sure you've got enough tape to hold it down. It will make this project so much easier.

Step 4: Separate your bundle into 2 even sides with 3 strands of each color. It helps if you separate each of the colors in the beginning so you don't end up with tangled strands down the line. I labeled each color to make it a little easier to explain.

Step 5:
Take one side of strand A and bring it across the other strands on the same side and tuck it under the opposite side.

Take the opposite side of strand A and repeat above but going the other direction.


Step 6:
Repeat step 5 with strands B, C and D


Continue repeating step 5 until you are happy with the length of your braid and tie off. Voila! You've just made an awesome friendship bracelet! Don't forget to make another one and give it to a friend :)

Tuesday, July 29, 2014

Featured Crafter- The Plush Plum


Happy Tuesday, fellow fans of crafts!

Today we're meeting with Lani from The Plush Plum. My experience with Lani has been perfectly wonderful, and we actually have a follow-up post in the works, so stay tuned for that ;) Lani is really easy to talk to and totally on top of what needs to be done. I like that.


The Plush Plum is adorbs. Like, seriously. So. Stinkin'. Cute. She makes all kinds of soft toys, but her dolls are sooooooooooo cute! They're little plush dolls, customized to what you (or your kid, if you're willing to share) want. 


Lani's dolls are amazing because they are 100% customizable. Whether a customer wants a doll version of themselves, someone else, or a character, Lani can do it! She's been sewing for quite some time now and has had her business open for one year (this month! Happy biz-iversary, The Plush Plum!). She started by dabbling with sewing projects, but as soon as she started making plush animals and dolls, she knew it was her calling.


Lani decided to start selling her creations because she wants to see more huggable dolls in this world. Many dolls that are mainstream these days (*cough* AG *cough*) are stiff and not very cuddly. When your kid (or you) goes to sleep at night snuggling the "mini-me", it's nice to know you won't lose an eye to a doll finger.


In chatting with Lani, something stood out to me. If you read these regularly, you know I never directly quote a crafter, but this is too perfectly said- "I will continue to make dolls as unique and precious as the little ones who love them."

To add to the cuteness already discussed, there are dresses and hats available in customized colors!


So, you're clearly convinced that her dolls are too cute for words. But what sets The Plush Plum apart from other shops with similar items? 


Communication, fun, and caring. Lani is definitely a communicator, which, let's face it, is what makes the world go 'round. If no one communicated with each other, we wouldn't even have internet. And then what would we do with ourselves?

Side note- OMG LOOK! (See... If you didn't have internet, you wouldn't have fallen in love with Petunia Platy, and what would your life be then?)


Outside of crafting, Lani likes to do puzzles and decorate her weekly planners. Which, beeteedubs, her weekly planner thing is sounding like a great idea to me. Every week, she decorates a new planner with washi tape and other supplies. It's like scrapbooking, but you don't have to worry about making it "work" for the other people involved. 

Now, for my favorite part of this whole deal- the weird fact. Lani is afraid of being in large, open bodies of water. She's good on a beach or boat, but not in the water. 

I can totally relate to this answer. If I was in an ocean and a fish touched my foot, I think I'd die on the spot. There's sharks and stuff out there, y'all. 

So, now you know Lani and The Plush Plum. Now you can fill your life with adorableness and never have a single regret about it. You're welcome.


Sunday, July 27, 2014

Repurposing Magazines: Awesome Coaster

Yes, I still have a TON of magazines so you might see these tutorials pop up so I can get rid of them :) This time we're going to make coasters. They're super easy, fun and they add a little flair to your coffee table while protecting from drips and sweat rings.

Materials:
Magazine
Elmer's glue
Hot glue

Start by cutting or ripping a few pages of your magazine into approximately 1" strips. They don't have to be exactly the same size, but should be close. (If you have leftovers from the bead tutorial, feel free to use those) Cut your strips in half lengthwise. Each coaster uses 14 strips so make sure you have 14 x # of coasters you want to make.

Step 1 Fold each strip in half so they're skinnier, not shorter. Take your Elmer's and glue as you fold to give
the coasters some reinforcement.


Step 2 After the glue has dried a little, take 2 strips and glue them in a "L" shape with your hot glue gun. Notice how the vertical strip is on the back side of the horizontal strip. You're going to alternate which side you glue your strips on the horizontal so pay attention to how you start out.


Step 3 Start gluing your 7 strips along the bottom and alternate which side you glue them to. I flipped the whole project each time I glued a new strip so that I
could glue it on top and I didn't get my pattern mixed up.


Step 4 When you've gotten your base glued, grab another strip and glue it along the vertical strip just above where your base sits. Weave under and over along the vertical strips until you've woven through all of them. Be sure to glue as you go so your coaster doesn't fall apart on you. Trim off the excess at the end of the row.


Step 5 Continue until you have all of your strips woven and glued in. Trim off the extras at the top when you finish. And now you have a coaster set. They're super easy to make and you won't feel too bad if you have to toss them. They make great Christmas presents too if you're on a budget.

Don't forget to keep the extra strips because I have a feeling we'll be using them again. Happy crafting!

Friday, July 25, 2014

Singer Heavy Duty Sewing Machine Review

Having a working sewing machine is pretty much necessary for me. Not only can I not use one if I don’t have one, but it makes my heart hurt. Maybe my brain? I’m not sure. I just know it causes a constantly increased stress level and makes me sad. Feeling icky makes me want to accomplish less, so it’s overall a bad deal.


Being that I need one to manage my hobby/business, when my 1970’s Bernina Bernette quit working, I had to make a call- Fix the old beast or buy a newer, faster machine. After a lot of weighing back and forth, I decided on getting a new machine and keeping the Bernina as a back-up.


I began the hunt for a sewing machine. So that you know, I really dislike making purchases like this. Things that later might cause me to think “Gah! I should have gotten the other one!” are rough. Any time I’m spending more than $50 on a single item, I go through this whole deal. I lean this way and that way and search all corners of the internet for possible options. I wonder what I’m going to kick myself for later, trying to fruitlessly predict what future problems future-me might have.


This time, I went to my shopping guru. She said “Singer. It’s the way to go.” I instinctively trusted that, and looked for a Singer that would make me happy.


I found it. In no time. The Singer Heavy-Duty Sewing Machine, Model Number 4423. You know
what it does? Not much. It sews stuff. But it does it really quickly. Top speed of 1,000 stitches per minute. It also does it really smoothly, effectively, and quietly. Check it out here.


It has the zig-zag stitches and the back-tack thing and all the stuff that ye average sewing machine has. It has it in a relatively intelligently laid out manner, and the case looks clean and simple. It sews evenly and well and doesn’t shake the table it’s sitting on (like the Bernette Monster did). It’s not particularly heavy in weight and isn’t all that large.


The one thing I don’t like about it is the spool holder is horizontal on top of the machine. To me, it makes the thread go through the machine in a weird way. I found an easy fix for that at JoAnn’s in the form of an overlock thread holder and cone spools. It works great, and even if I get a machine that holds the spool vertically, I’ll still use the overlocker.


If you want to do embroidery or get a machine that comes with a bazillion little doo-dads, this is not the machine for you. If you want one that will sew stuff to other stuff reliably and easily, it just might be. If you want to see things that have been sewn with this machine, visit these tutorials:

http://begangstress.blogspot.com/2014/07/20-minute-t-shirt-re-do-with-lace.html

http://begangstress.blogspot.com/2014/06/flower-and-lace-tank-top-tutorial.html

I've had the machine over 6 months now, and I've never had a single issue (that wasn't operator error). I've sewn lots of different materials on it- denim, cotton, satin, lace- and it handles them all beautifully.


Thursday, July 24, 2014

Repurposing Magazines: Cute Bracelet

Hello! Somehow I got wrangled into a year subscription of a magazine and I don't think I've read one issue. If you're like me and have a million magazines hanging around, I've got some repurposing tutorials for you! This first one is going to be making beads out of magazine pages and turning them into a bracelet.

What you need:
  • Magazines
  • Scissors
  • Elmer's glue
  • Hot Glue
  • Toothpick
  • Sturdy String (I used Embroidery Thread)
  • Clasps


Step 1:
Cut or tear a few sheets of magazines into approx. 1" thick strips (I found that folding and then tearing went faster and easier for me). The strips don't have to be exactly the same size. Cut the length of the strips in half


Step 2:
Take one strip and start rolling it around the toothpick. When you get about
halfway through, spread some Elmer's on the inside of the strip and continue to roll until you come to the end. Seal the end to the "bead" with more Elmer's and let it dry


Step 3: Continue step 2 until you have enough beads to go around your wrist (If you want to make a necklace, you can use the same technique you just need more beads.


Step 4: Tie one of the clasps onto your string. I used a little hot glue on the knots to keep them from unraveling. Start threading beads onto your string until you
have the desired length. Tie on the other clasp and add some hot glue to the knot to keep from unraveling. Snip the excess string and voila! Pretty bracelet or necklace!


 Be sure to save any extra strips you have because you can use them in our next Repurposing Magazines tutorial.

Tuesday, July 22, 2014

Featured Crafter- Corvid Castle


Happy Tuesday buddies! We're getting a little bit of rain here in a very dry California, so I'm one happy gal :)

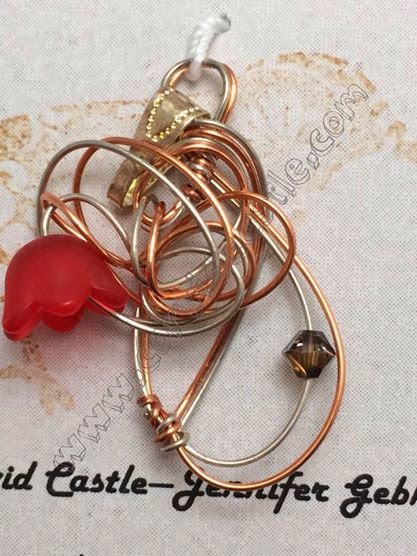
Today, we're here to talk about Corvid Castle, Jennifer, and Emily*. Corvid Castle provides high quality, handmade, gorgeous wire wrapped jewelry to fit every price range. Jennifer makes necklace pendants from wire and stones, beads, and other focal pieces. She also makes (obvs not from wire) scarves, hand-spun yarn, mobiles and other home decor items.

*We'll talk about Emily in a bit. 


corvid- a magpie or raven- was the inspiration for the name of Corvid Castle. If you could, for a moment, imagine a bird hoarding loads of shiny things for his castle, that would be a Corvid Castle. This theme of whimsy and imagination is very representative of the look and feel of Jennifer's shop. 

Overall, Corvid Castle was born of need. Jennifer was making jewelry for herself and her friends, and as people started requesting to buy items, it was only logical to create a business from it.


Jennifer loves making everything that she makes, and if she didn't, she wouldn't do it. She loves the wire pendants because they almost always come out differently than expected. It gives them life and personality, which represents that of the wearer. Spinning yarn is relaxing for Jennifer and she loves seeing how the different colors spin together to make something usable and lovely. 


Jennifer's favorite part about selling her items is seeing someone be as happy with her creations as she is. Luckily for us, she uses many colors of wire and many different, unique focal pieces. Many wire wrapped shops use sterling silver wire almost exclusively, which drives up the price of the finished pieces. Jennifer uses copper enameled wire, which provides quality and durability without the high cost.

Jennifer's shop is also unique in the variety of items she sells. There are no shops out there that provide the quality and variety that Corvid Castle does. 


Outside of Corvid Castle, Jennifer is an elementary school reading teacher, so she loves to read. I think this adds whimsy to her shop because, as we know, those who love to read also love to imagine.

Now, as far as imagination goes, Jennifer has her share, mine and yours. I've known Jennifer for quite some time, and although she may not realize it, her way of thinking and approaching situations makes her very inspirational. You cannot leave a conversation with Jennifer without feeling inspired to create something beautiful- Whether it be a craft, kind act, or bringing beauty into your life.

This is where Emily comes in. Emily is Jennifer's muse and the creative drive behind Corvid Castle. This might be a tad difficult to understand, so bear with me...


Emily is the named embodiment of Jennifer's creativity. Giving her creative side a name, and therefore a stronger presence, has allowed Jennifer to have "conversations" with her creativity, allowing it to flow more freely. 

If you're a crafter and have ever had an idea nag at you, that is your version of Emily. Name it or don't, but it's there. I don't have any research to back this up, but I assume that it's truly in everyone. I believe each person has the ability to create something lovely and driven- Maybe not directly a craft, but something that hasn't been done before. If each person could access this inspiration in the same way Jennifer has, our world would be filled with nothing but beauty. 

People would also talk to themselves less, because they'd be talking to their inspiration instead ;)


Monday, July 21, 2014

Bronzey Eyes and Orange Lips!

~Bronze Eyes and Orange Lips!~ 


This makeup look is super fun to do! You can keep the eyes simple with just a bronze shadow and a light brown color in the crease or you can smoke it out with a black shadow like I did. It's totally up to you! I hope you beauties enjoy the tutorial. =)

Products I used:
1) NYX eyeshadow base
2) Wet N' Wild trio in ' I'm Getting Sunburned'
3) Revlon single shadow in the color 'Taupe'
4) Black shadow from the Anastasia Beverley Hills pallet
5) Maybelline's 'The Falsies' mascara
6) Ardell lashes in the style 'Wispies'
7) Mac single shadow in the color ' Vanilla'
8) Ardell eyelash curler & black kohl liner from Benefit
9) Jordana Cosmetics lip liner in 'Tawny' & Milani's lipstick in ' Sweet Nectar'

LETS GET STARTED!

Step #1) As usual, we are going to start out with our face makeup first. I used a bronze blush and then added a little bit of an orange blush over top.

Step #2) Using a flat eyeshadow brush, pack on the bronze shadow. The one I used wasn't very pigmented and I was a little disappointed at first, but I just kept adding color to my lid and it came out just fine.

Step #3) Taking the single shadow in the color Taupe, I buffed it into my crease, somewhat blending it with the bronze I had just put on my lid.

Step #4) This step is optional, but I went ahead and smoked out the look. I took a black shadow and buffed it into the outer corner of my crease, making sure not to go in too far. Taking the black and bronze shadow, I applied the bronze color to the inner corner of my lash line and added the black to the outer corner.


Step #5) Apply your favorite mascara! I always use the same one...

Step #6) Adding false eyelashes is optional. I like to use them to add a little bit of a 'WOW" factor, if you will. I did not use a liquid liner this time. I just used my black shadow and applied it like I would my liquid liner. I winged it out and did everything the same, I just used a different product.

Step # 7) Taking any white shadow, I added it to the inner corner of my eye to brighten it up. I also applied this color to my brow bone, right under my eyebrow and to my cupids bow.

Step #8) We can now curl our lashes. If you're not using false lashes, I suggest curling your lashes before you apply your mascara. Curling your lashes after you've already put on mascara is not good for your lashes. I only apply a small amount of mascara before putting on my falsies so that they are a little darker. I then used my black liner to tight line and applied it to my water line as well.

Step #9) If you don't feel comfortable wearing an orange lip, then you can always go with a nude or whatever you prefer, but I hope everyone tries it out! Try something new and wear a bright lip if you haven't before! =) To line the lips, I used a nude lip liner and then applied the orange lipstick. The lipstick I used goes on really easily, but if yours is a little harder, just take your time and make sure to use a lip liner so your lipstick doesn't 'bleed'.

The look is complete! I hope you ladies try this out and if you do, let me know how it turned out in the comments! =)

XOXO, Kate