Showing posts with label Belinda. Show all posts

Sunday, December 14, 2014

Handmade Hot Hands Hand Warmers

I just finished up the Christmas gifts for my son's preschool teachers and I had to share this with you. It's super simple and makes a great gift.

What you need:

  • Fabric scraps (I used 2 different fabrics but you can stick with just 1 pattern)
  • A piece of cardboard to use as a template (I measured mine to be 3.5" x 4", you can make them any size you'd like, just measure 1/2" extra for your seams)
  • Rice (I used jasmine rice and added some lavender and rosemary that I had gotten out of my garden I cut the rosemary and lavender into little pieces and mixed it into the rice and let it sit for 3 days)
  • A sewing machine (because sewing this by hand would suck)

Using your cardboard template, cut 2 even pieces of fabric. Feel free to trim up the edges so they're fairly even (it doesn't have to be perfect since they're going to end up on the inside, but it helps you sew straight lines if your edges are straight and even)

 With right sides pinned together, start your sewing. Don't forget to leave 1 side completely unsewn so you can flip your bag right side out when you're finished with this step
 Don't forget to zig-zag all the way around the 3 edges you just sewed together to keep them from fraying in the future.
To make sewing your bag closed a little easier and cleaner, I folded down the top 1/4" and ironed the crease in it

 This is what it should look like when you flip it inside out

 Sew the final seam but leave 1/2" at the end to fill it up with your rice

 I couldn't find my funnel so I used a small piece of paper and taped it into a makeshift funnel. Start scooping your rice mixture into your beanbag. Be careful not to overfill because you're going to have to stitch the top closed on your machine when you're finished filling it. I sewed another seam completely across in case the first seam decided to come loose.
Since the rice bags are so small, you only have to heat them for 20-30 seconds and they stay warm for a long while.


I hope you find this tutorial useful and fun :)


Happy Crafting!!

Thursday, December 4, 2014

Quick Baked Macaroni and Cheese

This is one of my favorite dinners to make for a couple of reasons:
 1) It's super yummy
 2) It's super easy and you can add pretty much whatever you feel like.

Here's the basics you need:

  •  Macaroni noodles
  • Cream cheese
  • Cheddar cheese (shredded)
  • Half & half
  • Milk
  • Butter
  • Whatever spices you like to use. I used garlic, salt and pepper
You can also add ham, bacon, hot dog, etc if you feel like it

 Preheat your oven to 375°

Bring a saucepan full of water to a boil. When it's boiling, add in your noodles and turn down to med-high to boil until almost cooked. When it's finished, strain it and add a little butter to keep the noodles from sticking

Meanwhile, in a smaller sauce pan add 1/4 cup of half and half, 1/4 cup of milk, 1 tbsp of butter and about 1 oz of cream cheese. I turned the burner on medium and stirred frequently until the butter and cream cheese were melted.

 Once everything is melted, start adding your shredded cheese a handful at a time and stir it in until it's all melted.
Be sure to save about a handful of cheese to sprinkle over the top
 Pour your cooked noodles into your breadpan and then pour your cheese sauce over the top and mix it in well. You want to make sure your noodles are completely covered.
 Sprinkle the rest of your cheese over the top and stick it in the oven for 10-15 minutes. The cheese should be melted but not brown at all.


Finished product!


I hope you enjoy this recipe as much as my family and I do!

Thursday, November 6, 2014

Prom Dress Refashion

Hello crafty friends! I've been doing some much needed cleaning in my closet and came across my prom dress. I've only gotten to wear it twice (I used it one year for a Halloween costume) and it's been sitting in a box for the last 8+ years, so I decided it was time to give it a new look and new life.


To start off, I figured out where I wanted to make my waistline and pinned all around


Next, I cut where my pins were. This dress had boning in it so I had to rip out some seams to get the boning out and be able to cut all the way around the dress. I also cut about an inch above the waistline so that I would be able to fold it over the elastic I was going to use.
Since this dress had multiple layers of fabric, I pinned the layers together and then sewed a straight line the whole way around to secure them together.  Then I zig-zagged over the edge to keep it from fraying.

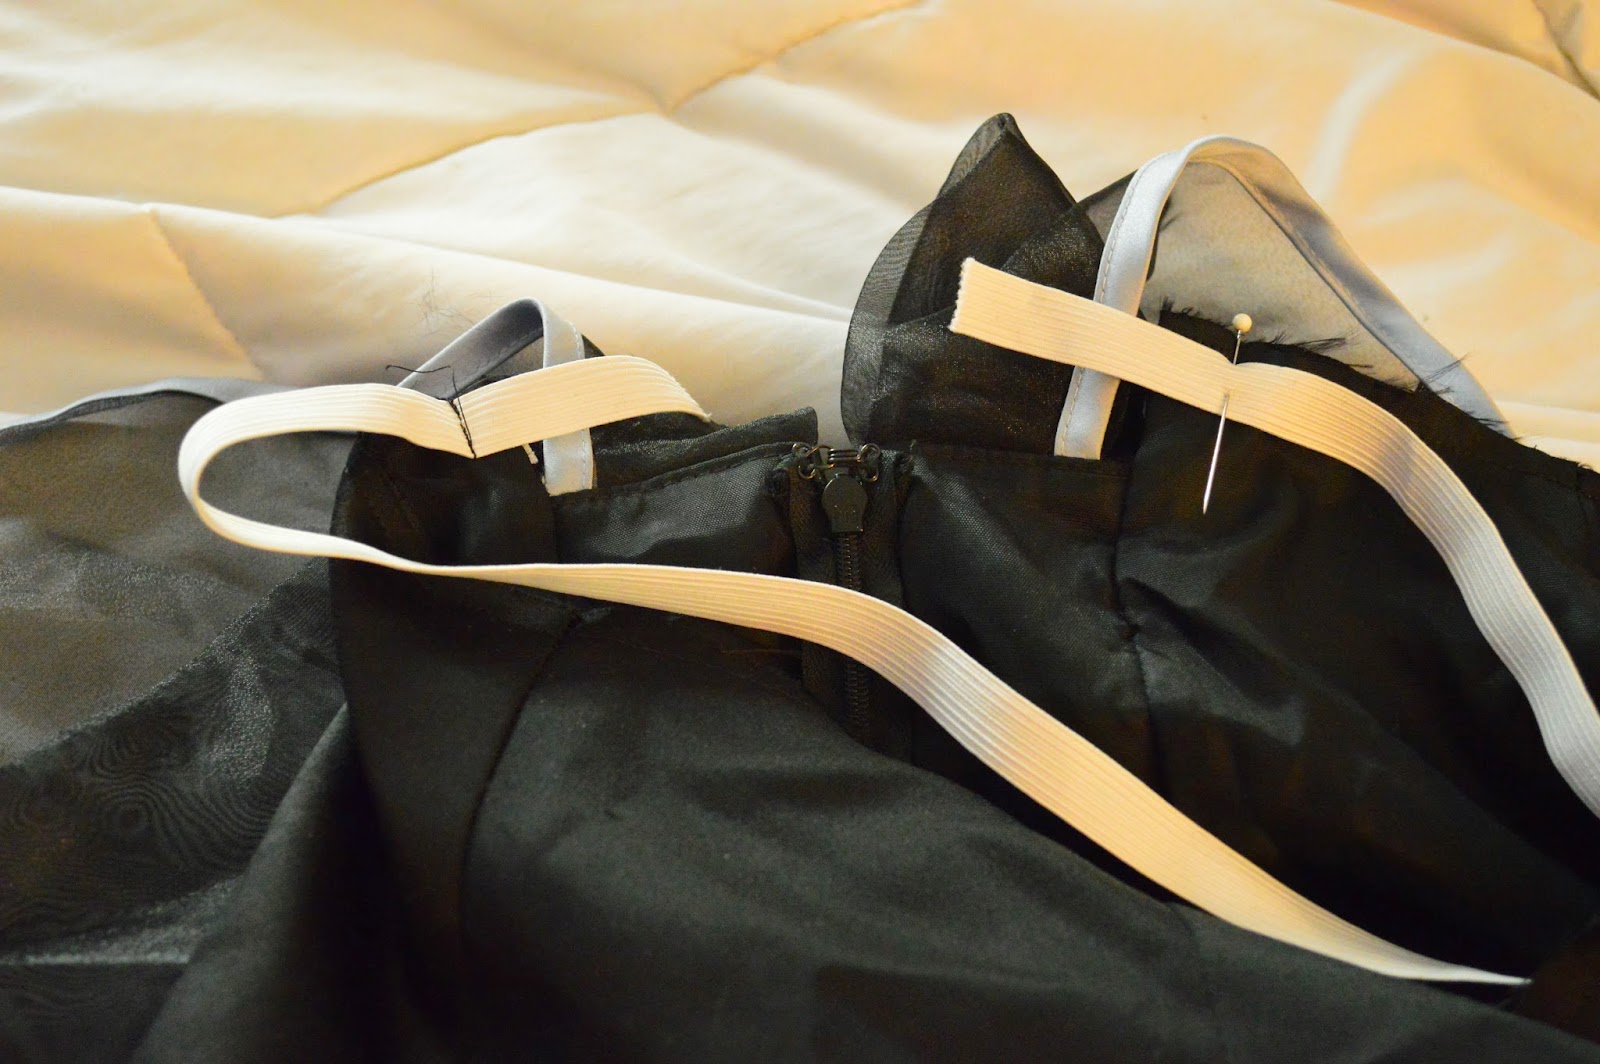
Next I started securing my elastic to the dress. This was kinda tricky because I didn't want the dress to bunch up any in the front, so I pinned the 2 ends of the elastic to the dress and then started pinning around as I went. I made sure the front of the dress laid flat and that all the bunch was going to end up in the back. The tricky part about elastic is that you have to stretch it as you sew.


Ta-Da!! Elastic secured!
After I sewed the elastic in, I folded the excess fabric over and sewed it down to create the waistline.

And that's it! I hope you are able to use this refashion to get some more life out of an old dress that you have floating around.
I'm feeling this skirt is a little plain, so I'm thinking of adding pickups to it to give it a different shape and make it less plain. Stay tuned and happy crafting!

Thursday, October 23, 2014

Earring Refashion: Giving Your Old Earrings New Life

I bought these earrings so long ago that they’re a little tarnished and dingy looking. I really like them but I haven’t worn them in forever because they’re not quite silver colored anymore.  This earring rebirth doesn't require much in the way of work it just takes a while because you have to let your polish dry completely before you move onto the next coat. The end result is totally worth the wait and watching paint dry.


What you need:
  •  Pair of old earrings. I used some plain silver danglies I got from Claire’s like a million years ago.
  • Nail polish (I used 2 colors but feel free to use only 1
  • Clothes pins (to hang your earrings dry)


Step 1 – Starting with your first color (or only color) give your earrings a nice even coat. Make sure you don’t have any spots where the color pools because it will end up lumpy and will take longer to dry. Let sit for about 30 minutes.


Step 2 – Using your first color again, give your earrings another nice even coat. This helps cover any blemishes and also makes the color brighter. Let sit for another 30 minutes


Step 3 – Using your second color (or your only color) give a nice and even final coat. Since the coat of polish is so thick you should let your earrings hang dry for at least an hour so you don’t end up accidentally making indents into the polish.

I’ve got a few more pairs that I’m going to do this to and I hope you were able to find this tutorial/refashion helpful. I’d love to see your finished projects!


Sunday, October 19, 2014

Adding Grips to Your Crochet Hooks

I’ve been noticing a lot lately that my hands are achy after I get done crocheting for a while. I’ve figured out that it’s because I’m gripping my hooks too tightly. Mostly because there’s nothing to hang onto so I hang onto that nothing for dear life.

I’ve seen so many awesome pictures of people baking clay onto their hooks, so I decided to give it a whirl.


What you need:
  •  Metal crochet hooks. If you don’t have a lot of clay, choose the ones you use most often
  • Oven bake clay – I used Sculpey’s Bake Shop brand
  • A strand of dental floss
  • Parchment paper
  • Cookie sheet


Step 1 - Cut off the amount of clay that you need from each block. It’s easiest if you take your dental floss and wrap it around your clay once where you want to cut it and then pull on the ends until it cuts all the way through. I then cut each of those pieces in half so I ended up with 6 even-ish pieces.


Step 2 – Take each piece and roll them out into  long skinny snakes that are approximately the same length.


Step 3 – Take 1 strand of each color, squish them together at the base and then start swirling them around each other so you end up with a long barber-pole snake.


Step 4 – Take your barber-pole snake and attach the smashed end to the bottom of your crochet hook and start twirling the clay around your hook. Make sure you don’t leave any gaps and that your clay hugs your hook tightly so it won’t slip off after it is baked.


Step 5 – Gently roll your covered hook like a snake, this ensures that your clay will stick to the hook and together.

Step 6 – Bake at 275° for 35-45 minutes. I originally checked my hooks at 35 minutes but they were still a little squishy, so I left them in for another 10 minutes.

Ta-da! Comfier hooks! They’re super easy to customize and I’d love to see your finished projects. Happy crafting!

Sunday, September 14, 2014

Easy and Yummy Crock Pot Chicken

 Are you looking for an easy dinner? What's easier than throwing 4 ingredients into a crock pot?

For this you'll need:

  • A crock pot (obviously)
  • Chicken breast (thawed)
  • BBQ sauce
  • Pineapple chunks
  • About 1 cup of water


 Step 1 - Place your thawed chicken in the crock pot. I only defrosted 2 pieces of chicken since I'm only cooking for my husband, son and self. Use as many pieces of chicken as you need.
 Step 2 - Mostly cover the chicken with barbecue sauce. What's nice about this recipe is that you don't have to use a ton of sauce. I probably used less than 1/4 cup for my 2 pieces of chicken.
 Step 3 - Add your pineapple and the juice in the can along with a cup of water. I used about 1/4 of the can for the 2 pieces I cooked.
Step 4 - Cover and cook on high for 4 hours and then low for another 2-3 hours or until your chicken is completely cooked.

I hope your family enjoys this recipe! Mine sure did :)